How to create a custom styled file upload in angular 9
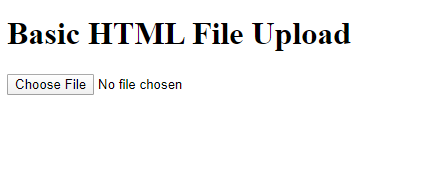
29.04.2021The basic HTML file upload

<h1>Basic HTML File Upload</h1>
<input type="file">
How change the style of this element?
npm i ng2-file-upload@latest --save
import { FileUploadModule } from 'ng2-file-upload';

imports: [
	FileUploadModule, ...
], imports: [
BrowserModule,
AppRoutingModule,
BrowserAnimationsModule,
FormsModule,
ReactiveFormsModule,
MatToolbarModule,
MatButtonModule,
FileUploadModule
],
Implement the client part
<div id="direct_upload" ng2FileDrop [uploader]="uploader" (fileOver)="fileOverBase($event)" [ngClass]="{ 'nv-file-over': hasBaseDropZoneOver }">
	<h1>Upload File</h1>
	<p>
	Please select an image. You can also drag and drop an image file into the
	dashed area.
	</p>
	<form [formGroup]="imageForm">
		<div>
			<button type="button" mat-raised-button (click)="fileInput.click()">
			Choose File
			</button>
			<input hidden [uploader]="uploader" (change)="fileInput.value = ''" ng2FileSelect #fileInput type="file" id="file" multiple />
		</div>
	</form>
</div>import { Component, OnInit, Input } from "@angular/core";
import { FormGroup, FormBuilder } from "@angular/forms";
import { FileUploader } from "ng2-file-upload";
@Component({
selector: "app-file-upload",
templateUrl: "./file-upload.component.html",
styleUrls: ["./file-upload.component.scss"]
})
export class FileUploadComponent implements OnInit {
responses: any[];
hasBaseDropZoneOver = false;
uploader: FileUploader;
imageForm: FormGroup;
constructor(private formBuilder: FormBuilder) {
this.imageForm = this.formBuilder.group({});
}
ngOnInit(): void {}
fileOverBase(e: any): void {
this.hasBaseDropZoneOver = e;
}
}
#direct_upload {
	padding: 20px;
	box-sizing: content-box;
	border-top: 1px solid #ccc;
	border-bottom: 1px solid #ccc;
	border: 4px dashed #ccc;
  }
Handling file upload
ngOnInit(): void {
	this.initializeUploader();
}


initializeUploader(): void {
    //Create the file uploader, wire it to upload to your account
    const uploaderOptions: FileUploaderOptions = {
      url: 'http://localhost:59976/files',
      // Upload files automatically upon addition to upload queue
      autoUpload: true,
      // Use xhrTransport in favor of iframeTransport
      isHTML5: true,
      // Calculate progress independently for each uploaded file
      removeAfterUpload: true,
      // XHR request headers
      headers: [
        {
          name: "X-Requested-With",
          value: "XMLHttpRequest"
        },
        {
          name: "Access-Control-Allow-Origin",
          value: "http://localhost:4200"
        }
      ]
    };
    this.uploader = new FileUploader(uploaderOptions);
    this.uploader.onBuildItemForm = (fileItem: any, form: FormData): any => {
      return { fileItem, form };
    };
}[Route("[controller]")]
[ApiController]
public class FilesController : ControllerBase
{
[HttpPost()]
public async Task<IActionResult> OnPostUploadAsync()
{
var files = Request.Form.Files;
long size = files.Sum(f => f.Length);
foreach (var formFile in files)
{
if (formFile.Length > 0)
{
var filePath = Path.GetTempFileName();
}
}
return Ok(new { count = files.Count, size });
}
}public void ConfigureServices(IServiceCollection services)
{
services.AddCors(c =>
c.AddPolicy("DemoAPIPolicy", policy => policy.AllowAnyHeader().WithMethods("POST", "OPTIONS").WithOrigins("http://localhost:4200").AllowCredentials()));
services.AddControllers();
}
// This method gets called by the runtime. Use this method to configure the HTTP request pipeline.
public void Configure(IApplicationBuilder app, IWebHostEnvironment env)
{
app.UseCors("DemoAPIPolicy");
...
}Handle upload status
<h2>Upload Status</h2>
<div class="file" *ngFor="let response of responses; let i = index">
  <h3>{{ response.file.name }}</h3>
  <div class="status" *ngIf="response.progress < 100">
    Uploading... {{ response.progress }}%
    <div *ngIf="!response.status">In progress</div>
    <div class="status-code" *ngIf="response.status">
      Upload completed with status code {{ response.status }}
    </div>
  </div>
  <div class="progress-container">
    <div class="progress-bar">
      <div
        class="progress"
        role="progressbar"
        [style.width.%]="response.progress"
      ></div>
    </div>
  </div>
  <div class="info">
    <div *ngIf="response.progress && response.progress < 100">
      Still working...
    </div>
    <div *ngIf="(response.progress && response.progress == 100)">
      Upload was successful
    </div>
    <div *ngIf="response.status && response.status !== 200">
      Ooops something went wrong
    </div>
  </div>
</div>this.uploader.onProgressItem = (fileItem: any, progress: any) =>
this.upsertResponse({
file: fileItem.file,
progress,
data: {},
});
}
upsertResponse = (fileItem: any) => {
const existingId: any = this.responses.reduce(
(prev: any, current: any, index: number) => {
if (
current.file.name === fileItem.file.name &&
!current.status
) {
return index;
}
return prev;
},
-1
);
if (existingId > -1) {
this.responses[existingId] = Object.assign(
this.responses[existingId],
fileItem
);
} else {
this.responses.push(fileItem);
}
};constructor(private formBuilder: FormBuilder) {
this.imageForm = this.formBuilder.group({});
this.responses = [];
}.progress-container {
width: 100vw;
height: 12px;
position: relative;
.progress-bar {
width: 100px;
height: 12px;
position: absolute;
top: 50%;
right: 50%;
transform: translate(50%, -50%);
.progress {
height: 12px;
background-color: #b5d3e7;
width: 0;
}
}
}
