Softwareentwicklung Zürich & Deutschschweiz

HOW TO HANDLE LOCALIZATION FROM A CLIENT APPLICATION IN DOTNET CORE WEB API

29.04.2021
Software engineering becomes more and more complex. Nowadays it's very common to implement your applications service-oriented (SOA), microservices and single page application. All of these buzzwords mostly have one thing in common. They use or even are built as RESTful services. When calling a service from any application it's important for usability reasons to get the context or notifications in the current selected language.
Since my expertise in backend development is based on .NET framework, a RESTful service is usually a dotnet core WEB API. In every application I was creating until now, I always needed a strategy on how to use the language which the user selected on client side in the API. The following article will explain how I'm going to fulfill this requirement.

How to use localization in dotnet core?

Localization in .NET and dotnet core is always based on resx files. The following example is based on dotnet core Web API but it's similar in every other .NET based application. What we need to do first is to create a resx file for each language you want to support. In my example I'm going to use a default AppStrings.resx which represents the german language as well as a AppStrings.en.resx for english localization.
Next we're going to register the supported languages in Startup.cs in the Configure method.
var supportedCultures = new[] {
	new CultureInfo("de-CH"),
	new CultureInfo("en-UK")
};

app.UseRequestLocalization(new RequestLocalizationOptions
{
	DefaultRequestCulture = new RequestCulture(new CultureInfo("de-CH")),
	SupportedCultures = supportedCultures,
	SupportedUICultures = supportedCultures,
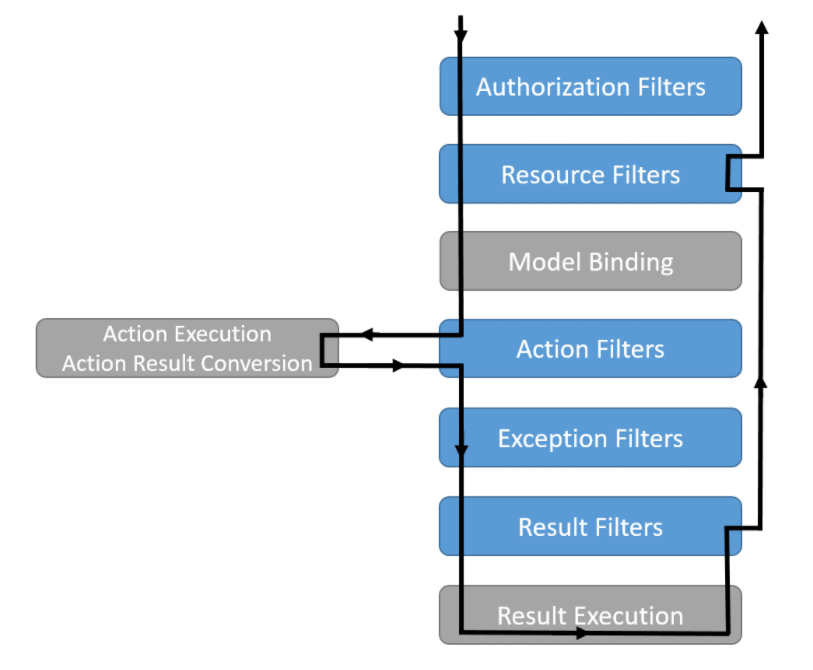
});

The dotnet filter pipeline

There's a given filter pipeline in ASP.NET applications. This is always as follows. At first the Autorization Filter is being executed which determines whether the user is allowed to call the action. Next the so called Resource Filters are executed. This execution happend before any logic is executed and also before the request context is bound to the defined models and parameters. After the model binding Action Filters come into place. Mostly you will make use of Resource Filters or Action Filters. If you want to know more about the dotnet filter pipeline you can use this link.

Backend implementation

In our language example we're going to use a Resource Filter. This is because the language must be set before executing any action and also because we're using request model validation which should be translated as well and will be handled before the Action Filters. So what we're going to do is to extract the language from the request header. Therefore our client sets the 'Accept-Language' header which we will use in the language filter.
public class LanguageFilter : IResourceFilter
{
	public void OnResourceExecuting(ResourceExecutingContext)
	{
		if (context.HttpContext.Request.Headers.ContainsKey("AcceptLanguage") && context.HttpContext.Request.Headers["AcceptLanguage"].Count > 0)
		{
			LanguageHelper.SetLanguage(context.HttpContext.Request.Headers["AcceptLanguage"].First());
		}
	}

	public void OnResourceExecuted(ResourceExecutedContext)
	{
	}
}
As you can see, in the resource filter we're simply extracting the AcceptLanguage attribute and set it in our current thread using a LanguageHelper class.
public static class LanguageHelper
{
	public static void SetLanguage(string language)
	{
		var culture = new CultureInfo("de-CH");

		if (language == "en-UK" || language.Contains("en"))
		{
			culture = new CultureInfo("en-UK");
		}

		Thread.CurrentThread.CurrentCulture = culture;
		Thread.CurrentThread.CurrentUICulture = culture;
	}
}
Usually, it should be enough to use CurrentCulture only. For simplicity and consistency reasons I always set CurrentCulture as well as CurrentUICulture.

Frontend implementation

In angular we are simply implementing a http interceptor which will intercept all requests sent from the client. The most important header we'll set here is the AcceptLanguage header. Here we're going to call our client-side language service which holds our current selected language and returns the language string that correspond to the ones we declared in our startup.cs file. If you're not using angular this should work similar. You simply need to set the header in your client.
@Injectable()
export class HeaderInterceptor implements HttpInterceptor {
  constructor(private translationService: TranslationService) {}

  intercept(request: HttpRequest<any>, next: HttpHandler): Observable<HttpEvent<any>> {
    return this.authService.getTokenSilently$().pipe(
      mergeMap(token => {
        request = request.clone({
          setHeaders: {
            'Access-Control-Allow-Origin': '*',
            'Access-Control-Allow-Method': 'GET,POST,OPTIONS,DELETE,PUT,PATCH',
            'Content-Type': 'application/json; charset=utf-8',
			'Cache-Control': 'no-cache',
			Accept: 'application/json',
            AcceptLanguage: this.translationService.getLanguageString(),
            Pragma: 'no-cache'
          }
        });
        return next.handle(request);
      }),
      catchError(err => throwError(err))
    );
  }
}
This is everything we need to do to have a working localization example for distributed applications. Every string will be translated once you use the AppStrings.resx files. You can use them using the static AppStrings class. Therefore the resx access modifier must be set to public.
var subject = AppStrings.GuestSubscription;
If you have any questions or improvements please send me an email to
© 2016-2024 OneCodex GmbH – All rights reserved